Color gel photography is a fantastic way to make your images stand out with bold, vibrant lighting effects that instantly grab attention. Whether you’re shooting portraits, fashion, products, or creative concepts, adding colored lighting can completely transform the mood and atmosphere of your photos. The best part? It’s innovative, fun, and affordable—perfect for photographers of all levels.
What is Color Gel Photography?
Color gel photography is a technique where you place a transparent colored filter—known as a color gel—over a light source. This simple addition can dramatically change the tone and feel of your image. By altering the color of your lights, you can evoke different emotions, add artistic flair, or create surreal environments without heavy post-processing.
From subtle color accents to intense neon vibes, color gel photography opens up endless creative possibilities. It’s popular in music videos, magazine editorials, product ads, and creative portrait shoots. And the good news? You can start experimenting with just a few inexpensive gels and basic lighting equipment.
In this guide, we’ll explore five creative ways to utilize color gel photography effectively, along with additional tips to elevate your results to the next level.
Use One Color Gel for a Clean, Bold Look
One of the easiest ways to start with color gel photography is by using a single gel over your primary light source. This creates a consistent color tone across your subject, resulting in a clean, bold aesthetic.
-
Setup tip: Position your colored leading light at the front or slightly to the side of your subject.
-
Avoid background spill: Place the light far enough from the background so the colored light doesn’t unintentionally tint it.
-
Experiment with settings: Adjust the distance, shutter speed, and aperture to control brightness and saturation.
Single-color lighting works beautifully for dramatic portraits, editorial shots, and stylized product photography.
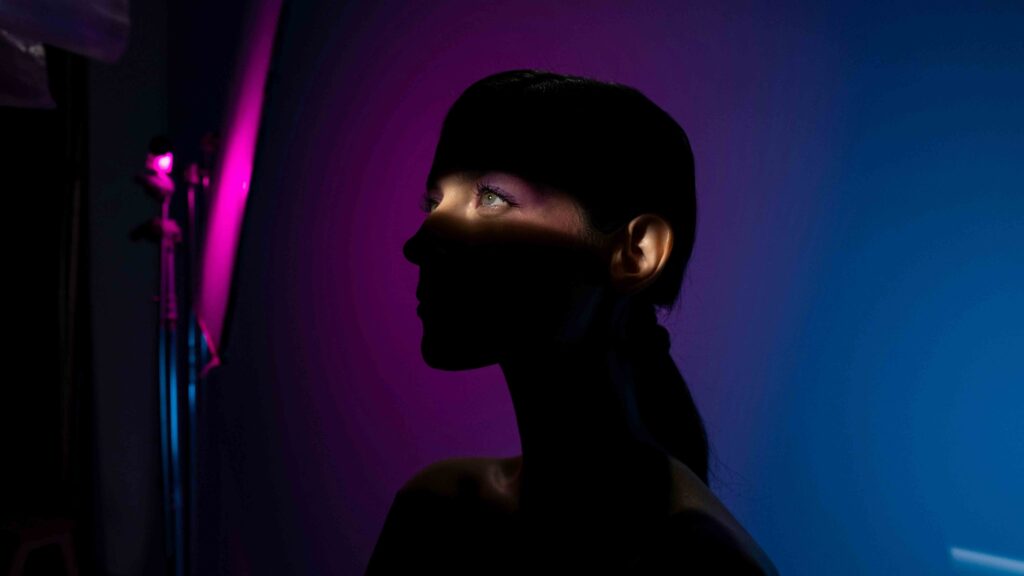
Use Two-Color Gels for Dynamic Split Lighting
Two-color gel photography is one of the most popular techniques because it produces visually striking and dynamic results. By lighting each side of your subject with a different color, you create contrast and depth.
-
Color theory matters: Before selecting gels, understand which colors complement each other. Classic combinations include purple-pink, red-green, pink-orange, or blue-orange.
-
Best positioning: Place each colored light on opposite sides of your subject, angled toward the center. The magic happens when the two colors meet at the bridge of the nose—this is called split lighting.
-
Creative freedom: Try adjusting the intensity of each light for subtle or bold effects.
Experiment with Three-Color Gels for Artistic Blends
If you’re feeling adventurous, try using three different gels. It sounds chaotic, but when done right, it can create stunning, multi-toned visuals.
-
Balanced approach: Use two vibrant gels and one white gel to soften and unify the colors.
-
Set-up idea: Place the lighter gel in front of the subject and the darker gels on each side in a triangle lighting setup.
-
For bold results: If you go all vibrant, put the lightest color in the front and darker tones on the sides for a balanced yet dynamic image.
Read also: Beauty Product Photography for eCommerce Site
Light the Background
Want to give your plain backdrop a complete makeover without buying multiple backgrounds? Use color gel photography to light the background instead of the subject directly.
This method allows you to change the backdrop color instantly—ideal for product photography, fashion shoots, or headshots. You can even blend different gels to create gradient backgrounds, adding depth and dimension to your images.
Use Color Gel as Props
Color gels don’t always have to cover your lights—they can also be used as props for unique effects.
-
Let your model hold the gel in front of their face for a futuristic vibe.
-
Could you place the gel in front of your camera lens for dreamy, hazy color flares?
-
Layer multiple gels for abstract shapes and patterns.
This playful approach works great for experimental shoots, music photography, and promotional campaigns.
Final Tip – Don’t Skip the Editing!
While color gels add magic to your images, post-processing can make them truly shine. Editing allows you to:
-
Enhance color vibrancy and contrast.
-
Could you remove any unwanted shadows or spills?
-
Perfect skin tones while keeping color effects intact
If you want professional, polished results without spending hours in Photoshop, services like Dropicts offer expert retouching, color correction, and background cleanup—perfect for photographers, brands, and eCommerce sellers.
Final Thoughts
Color gel photography is an exciting, affordable way to add creativity and emotion to your work. Whether you stick to a single tone, mix multiple gels, or use them to transform backgrounds, this technique offers endless possibilities for artistic expression.
The key to mastering color gel photography is experimentation—play with angles, color combinations, and light intensity until you find a style that fits your vision. With the proper setup and a touch of post-production magic, you can turn ordinary photos into bold, captivating art.

Image Source:
pexels.com
pexels.com